
Minimum intrusion Grid, MiG, is a Grid middleware that seeks to make access to Grid as easy as possible for both users of - and contributors to Grid, in addition to solving a number of other problems that are found with most other Grid systems.
The MiG model is based on a dual client-server architecture, where clients communicates with the servers that constitutes Grid and resources does the same as you can see in the figure below.
Figure: Abstract model of the MiG architecture
Thus to use the resources on Grid you must communicate with Grid and not, as seen in most other Grid models, with the resources directly.
This model ensures amongst other things that the user and resource remains mutually anonymous and that Grid can take responsibility for failing resources and resubmit jobs without the users intervention if a resource fails to execute a job it has been assigned.
Jobs are scheduled on the resources based on an economical model which will not be covered in this tutorial. For most users the scheduling will appear as a FIFO queue.
The actual Grid of course is a distributed system and looks more like this,
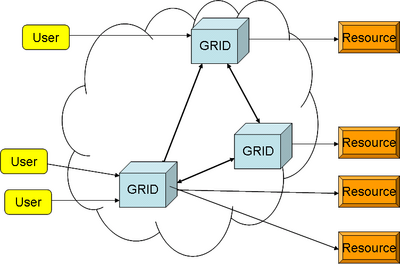
Figure: The real MiG architecture
3 Requirements to get started
To use MiG you need not install any Grid specific software at all. All you need is a web-browser that is HTTPS and x.509 enabled. You then go to the MiG web-site to request a certificate, go to www.migrid.org and follow the MiG menu point. You then arrive at a page that looks as
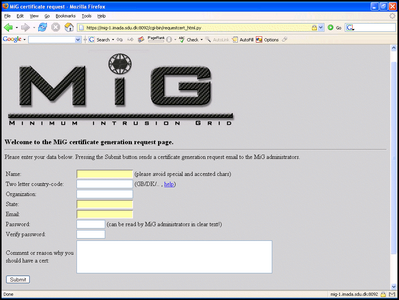
Figure: The MiG certificate request page
You fill in the required fields and press submit. Once your request has been accepted you will receive a certificate which you must import into your browser.
DIKU students should clearly state that they are DIKU students and refer to Brian Vinter in the field noted Comments. You must use your DIKU email- address for verification; no outside emails will be accepted for this.
Once you receive and import your certificate into your browser you are ready to get started. You open the browser you imported the certificate into and go to the URL https://www.migrid.org. Note that this is exactly the same address you visited before, but by asking for a secure connection (by using https), you are directed to your personal start page as shown below.
This is your personal entry-page and will in the following be referred to simply as the entry-page.
Note that MiG is a distributed system which means that you will not necessarily arrive at the same physical host every time you go to the entry page. However, you should not be able to tell the difference, all your files and jobs will be available from any node within the MiG system.
From the entry page there are a number of options, most of which you should ignore for now, you really only need the first two, Submit Job and Files.
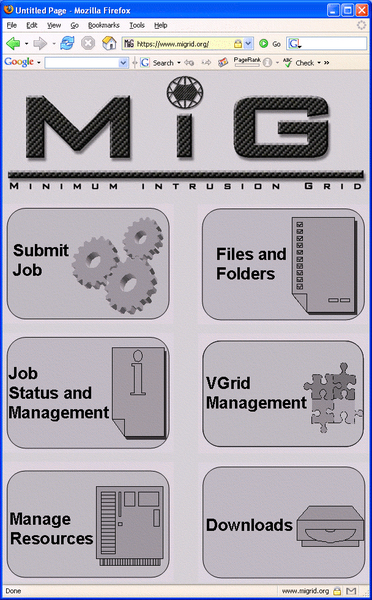
Figure: The MiG start page for users
One element in MiG that differentiates it from any other Grid you may have tried is the fact that as a registered user you have a home-directory, just as on an ordinary computer system. This means that once your are ready to start running jobs on Grid you can simply refer to files by their path relative to your MiG home-directory. Your files are perfectly safe from other users of course and computing resources are only allowed to see the files that you specify.
If you have not worked with other Grids before you may not understand why we make such a point of accessing files since it probably seems intuitive to you, however if you have had to work with storage elements and gridftp up- and downloads you will notice a major difference in the way MiG works with respect to files.
So now you can click the Files button and you get to your personal home directory, which of course is empty. From here you can upload files using the upload feature in the bottom of the page, or you can create subdirectories using that button. Pretty soon your MiG home directory will be as messy as the desktop on your PC.
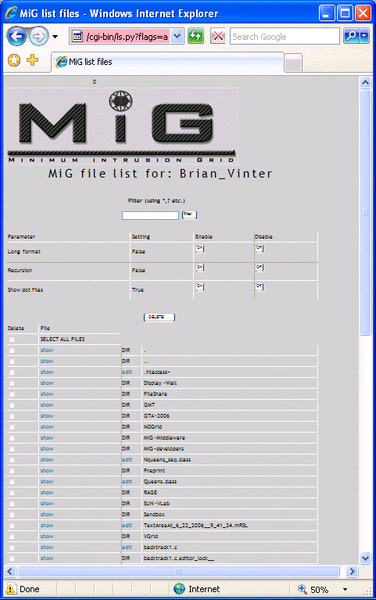
Figure: A typical and messy home-directory
You now go back to the entry page and press Submit Job to get you to the page that allows us to submit a job. If you are unfamiliar with batch-processing systems this may seem quite alien to you, but the point is that to get to any high performance computing resource one always goes through a queue, this happens to ensure exclusive access to the system for your needs. Thus on the submission page you get to specify the job you would like to have places in the queue.
The language we use to specify the jobs is very simple and you will figure it out quickly. The notation is that we have a number of keywords, that all begin and end by two colons, i.e. ::KEYWORD::. The lines following a keyword are the specifications you have with respect to that keyword and all lines up until an empty line will be treated under the above keyword. The keywords that are available are: EXECUTE, INPUTFILES, OUTPUTFILES, EXECUTABLES, CPUTIME, MEMORY, DISK, RUNTIMEENVIRONMENT, JOBNAME, NOTIFY, ARCHITECTURE, ENVIRONMENT, CPUCOUNT, NODECOUNT, MAXPRICE.
For most of your jobs you will only need a few of these keywords.
Once you have written your job you press submit and the job is placed in the queue. An example job will be presented later in this tutorial.
The lines following the EXECUTE keyword are the body of the script you get executed on the resource. You can typically try out these lines in a script of your own before submitting.
The lines following this keyword are simply files that should be available to the job, they are either copied to the resource or they are made available for remote access from the resource. The path of the files are relative to your home-directory and that path will be preserved at the resource, i.e. testdir/input.txt will be places at testdir/input.txt at the resource side also!
The lines following OUTPUTFILES are the result files that are produced by your job. They are either copied to your home-directory at the end of the job or they are written directly to the MiG storage. Paths are preserved as with INPUTFILES, note that at file may both be an input and an output file at the same time.
Executables are just like INPUTFILES except that they are always copied to the resource and once there they are marked as executables.
The line following this line is interpreted as the maximum time, in seconds, your job will be running, normalized to a 1GHz P4. If your job runs longer than that it will be assumed that an error has occurred and the job will be killed. Note that the longer you specify your job will take the longer you are likely to wait in the queue. This keyword is ignores any but the first following line.
The line following the keyword states how much memory your job needs, specified in MB. The more you ask for the fewer resources will be able to match your request and you will wait longer in line.
The line following the keyword states how much memory your job needs, specified in GB. The more you ask for the fewer resources will be able to match your request and you will wait longer in line.
The lines after this keyword specifies the preinstalled runtime environments you need. These are applications or libraries that the resource must already have installed. You can see the available runtime environments by clicking the Runtime Environments button on the entry-page.
The first line following this keyword is a symbolic name that you may assign to a job. No such name is needed but if you run many similar jobs you can use this filed to tell the jobs apart.
The notification option allows you to be informed once MiG has completed your job. Possible notifications are email and jabber. A line as jabber: <your jabber id> or email: <your email address> specifies that your want a jabber, or email, message once the job has been executed. The message will include the status of the execution and links to standard output and error.
Here you may specify a required CPU architecture, currently supported architectures are:
This keyword allows you to specify environment variables that you want to be set before your job runs. An example could be OMP_NUM_THREADS=8.
The line after this keyword is an integer that specifies how many CPUs you need in the machine you request. Note that this refers to CPUs in a single node. If you need to specify a cluster you need the next keyword NODECOUNT.
Two lines as: ::CPUCOUNT:: 8 Will thus mean that you need a machine with at least 8 CPUs.
DIKU students should simply use the CPUCOUNT 8 to get access to the 8 CPU machine for their tests.
The line after this keyword is an integer that specifies how many nodes in a cluster you need in the machine you request. If you want a cluster of SMP nodes you use both CPUCOUNT and NODECOUNT in your job description.
DIKU students should simply use the NODECOUNT 8 to get access to the cluster for their tests. MISSING: A list of the node names in the cluster will be available shortly!
The line following this keyword specifies the maximum price you are willing to pay for the execution of this job. An in depth discussion of the pricing systems is beyond the scope of this tutorial and you are referred to the MiG web site for this.
The VGRID keyword specifies the Virtual Organisation(s) you submit this job for execution to. By this option you can draw on resources that are associated with a Virtual Organisation that you are a member of.
DIKU students should use the VGrid, DIKU, i.e.:
  ::VGRID::
  DIKU
To gain access to the resources reserved for DIKU.
As an example let's try an write a small test to run on Grid. You are going to attack the famous N-Queens, see http://en.wikipedia.org/wiki/N-queens, problem by using Grid. You are not going to attempt to use any smart algorithms, nor are you going to use Grid for parallel processing, this is simply a small test to get to run a job on Grid.

Figure: An n-queen example, n=8
The naive algorithm for solving the n-queens problem is shown below in Java.
  class Queens {

    public int n=8;
    public int count = 0;
    int [] all;

    boolean legal(int i){
      for(int x=0;x<i;x++){
        if(all[i]==all[x])return(false);
        if(all[x]-(i-x)==all[i])return(false);
        if(all[x]+(i-x)==all[i])return(false);
      }
      return(true);
    }

    void make_boards(int i){
      for(int y=0;y<n;y++){
        all[i]=y;
        if(legal(i)){
          if(i+1==n)count++;
          else make_boards(i+1);
        }
      }
    }

    Queens(int n){
      this.n=n;
      all=new int[n];
      make_boards(0);
    }
  }

  public class Nqueens_seq {
    public static void main(String args[]){
      int n=8;
      if(args.length>0)n=new Integer(args[0]).intValue();
      System.out.println(new Queens(n).count+" with "+n+" queens");
    }
  }
Figure: The Java code for the test program
You save this code under the name Nqueens_seq.java on your local machine and compile to file with the java compiler, javac Nqueens_seq.java, to produce two new files: Nqueens_seq.class and Queens.class, these are the executables you are going to use in the Grid job.
Now you need to write a job description that may be put into the queue. You are going to try to get an answer for n=15. The job is quite simple thus you really only need to run java Nqueens_seq 15. For java to be able to run this it needs the two class files to be available so you first open the Files option on your entry-page and upload the two files to your Grid home-directory.
Once that is done, go back to the entry-page and choose the Submit Job option. The job needs to run java Nqueens_seq 15, and it needs the two input files we just uploaded. We may assume that this task can be executed in 100 seconds on a standard PC, thus the CPUTIME is set to 100. Our MiG job then looks as:
  ::EXECUTE::
  java Nqueens_seq 15

  ::INPUTFILES::
  Nqueens_seq.class
  Queens.class

  ::CPUTIME::
  100
Once you press Submit the job will enter the queue and you start waiting for the result. The submit button should forward you to a page that says
  == Success ==
  300021_6_6_2007__8_5_27_mig-1.imada.sdu.dk.0 is the job id assigned.
Naturally the ID of the job will be something other than 300021_6_6_2007__8_5_27_mig-1.imada.sdu.dk.0 in your case.
If you can't be bothered to test if the job has been completed you can add a notification request to the job, like:
  ::NOTIFY::
  jabber: <Your jabber compatible IM address>
Which will give you an instant messenger notification when the job has completed. If you do so at one point you will get a message that looks something like:
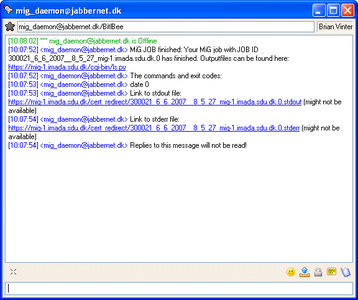
Figure: The jabber message that your job has finished
Once the job is finished you can see the result in your home directory under the job-id.stdout. If you chose the IM notification it will include a direct link to the standard out of your job. If you open the file, either from your home-directory or the direct link, you should see something like:
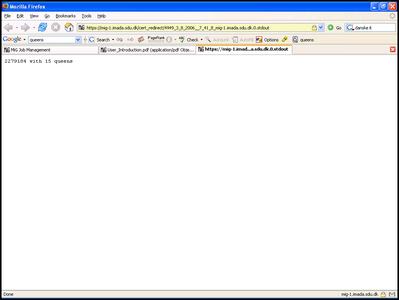
Figure: The result of your job
And you have successfully run your first job. If your job had included result-files marked under ::OUTPUTFILES::, they too would be available from your home-directory.
The shared memory machine is very simple to use as you need nothing special to set up execution, any multithreaded program should compile and run without problems. To see that you are on the DIKU 8 way machine you can run a simple testjob:
  ::EXECUTE::
  cat /proc/cpuinfo

  ::VGRID::
  DIKU

  ::CPUCOUNT::
  8
For various reasons LAM MPI makes some rather strange assumptions about the execution model that does not fit with MiG. So to run LAM mpi jobs on MiG you create a script that is your actual execution, here it's called mympi.sh. In this script we describe our job, i.e. we want to compile the application, boot lam, run the application and stop lam again.
  mpicc mcpi.c -lm
  lamboot -v mpihosts
  mpirun -np 8 a.out 100000000
  lamhalt
Note that we also use a mpihosts file that contains the names of the cluster nodes to use:
  c0-0
  c0-1
  c0-2
  c0-3
  c0-4
  c0-5
  c0-6
  c0-7
And in addition we also have a source file mcpi.c.
We can then create a MiG job that executes the mympi.sh script:
  ::EXECUTE::
  ./mympi.sh

  ::EXECUTABLES::
  mympi.sh

  ::INPUTFILES::
  mpihosts
  mcpi.c

  ::NODECOUNT::
  16

  ::VGRID::
  DIKU
Submit this job after you have made sure that mympi.sh and mpihosts are in your home directory and you should be able to run.
PVM unfortunately does not comply with its own manual and is not able to boot a hostfile as a parameter. We therefore need to create a custom bootfile for pvm, let's call it pvm_boot that looks as:
  add compute-0-0
  add compute-0-1
  add compute-0-2
  add compute-0-3
  add compute-0-4
  add compute-0-5
  add compute-0-6
  add compute-0-7
To stop pvm we create a file, pvm_halt, with one line:
pvm_halt
As with MPI the easiest way to work is through a script, this will allow you to test the program on a local system before submitting to MiG. We must remember that PVM is a somewhat primitive system so it needs a lot of care to run. The example program used here may be found at http://ups.savba.sk/PASP/calcpi/calcpi.html - and consists of two files calcpi.c and dboard.c, you chould change the calcpi.c file to pvm_spawn from an absolute path, which we only know if we copy the calcpi to a fixed location ('/home/mig' should work on this resource), ie. the line:
rcode = pvm_spawn("calcpi", NULL, PvmTaskDefault, "", nworkers, tids);
becomes
  rcode = pvm_spawn("/home/mig/calcpi", NULL, PvmTaskDefault, "", nworkers,
  tids);
To compile and run it we thus make a script, mypvm.sh:
  gcc calcpi.c dboard.c -I/usr/share/pvm3/include -L/usr/share/pvm3/lib/LINUX
  -lpvm3 -lgpvm3 -o calcpi

  cp calcpi /home/mig/

  pvm < pvm_boot

  echo 8 | ./calcpi

  pvm < pvm_halt

  rm -f /home/mig/calcpi
Thus we end up with a MiG job that looks as:
  ::EXECUTE::
  ./mypvm.sh

  ::INPUTFILES::
  pvm_boot
  pvm_halt
  calcpi.c
  dboard.c

  ::EXECUTABLES::
  mypvm.sh

  ::NODECOUNT::
  16

  ::VGRID::
  DIKU
If we return to the N-Queens example from above we can try a slightly modified version, which uses the ENVIRONMENT and RUNTIMEENVIRONMENT features of MiG. Strictly speaking resources in MiG do not guarantee anything beyond providing a simple user environment. I.e. we can not expect that interpreters, compilers or libraries are available. In the Java NQueens example we simply hoped for the availability of the Java interpreter and in most cases we are lucky and get a resource where it is in fact available. This may not be the case for less common tools, so the only way to make sure, is the use of runtime environments. We could create a JAVA runtime environment, but for this example we will use the existing PYTHON-2 runtime environment instead. Resource owners can advertise the availability of python by specifying that they include the runtime environment and thus the location of the interpreter. Jobs are always only executed on resources that advertise the requested runtime environments.
Let's change the code to python and use the PYTHON-2 runtime environment to make sure that the job is executed on a host with python installed.
  #!/usr/bin/python

  """Naive NQueens solver"""

  import sys


  class NQueens:
      n = 8
      count = 0
      all = []

      def __init__(self, n):
          self.n = n
          self.all = [0 for i in range(n)]
          self.make_boards(0)

      def legal(self, i) :
          for x in range(i):
              if self.all[i] == self.all[x]:
                  return False
              if self.all[x] - (i - x) == self.all[i]:
                  return False
              if self.all[x] + (i - x) == self.all[i]:
                  return False
          return True

      def make_boards(self, i):
          for y in range(self.n):
              self.all[i] = y
              if self.legal(i):
                  if i + 1 == self.n:
                      self.count += 1
                  else:
                      self.make_boards(i + 1)


  if __name__ == '__main__':
      n = 8;
      if len(sys.argv) > 1:
          try:
              n = int(sys.argv[1])
          except Exception, err:
              print "Illegal input: %s" % err
              sys.exit(1)

      nqueens = NQueens(n)
      print "%d with %d queens" % (nqueens.count, n)
Figure: The Python code for the test program
You save this code under the name nqueens.py on your local machine and this is the executable you are going to use in the Grid job.
Now you need to write a job description that may be put into the queue. This time we are going to try to get an answer for n=12. The job is quite simple thus you really only need to run
python nqueens.py 12
However, resources do not guarantee that the python interpreter is available, so we need to guide the job to a resource with python installed. This is where runtime environments come into play in the form of the PYTHON-2 runtime environment. Please refer to the **Runtime Envs** page for details about the different runtime environments and what they provide/guarantee. Prepare for running the job by saving the python code in your MiG home e.g. open the Files page from your entry-page and upload the file to your Grid home-directory.
Once that is done, go back to the entry-page and choose the **Submit Job** option. The job needs to know that python is installed and where the interpreter is located. This is achieved with the RUNTIMEENVIRONMENT option and the existing PYTHON-2 runtime environment. The latter guarantees that the environment variable PTYHON contains the path to the python interpreter. Thus we modify the EXECUTE command above slightly and set INPUTFILES to the python code file we just uploaded. We may assume that this task can be executed in 100 seconds on a standard PC, thus the CPUTIME is set to 100. Our MiG job then looks like:
  ::EXECUTE::
  $PYTHON nqueens.py 12

  ::INPUTFILES::
  nqueens.py

  ::CPUTIME::
  100

  ::RUNTIMEENVIRONMENT::
  PYTHON-2
We could also change the input variable to an ordinary environment variable, BOARDSIZE:
  ::EXECUTE::
  $PYTHON nqueens.py $BOARDSIZE

  ::INPUTFILES::
  nqueens.py

  ::CPUTIME::
  600

  ::RUNTIMEENVIRONMENT::
  PYTHON-2

  ::ENVIRONMENT::
  BOARDSIZE=12
This is obviously completely unnecessary, but it displays the usage of the ENVIRONMENT field.
No submit the job and await the result as for the Java example above.
...